Audio Field Setup Guide V1.0
FX6 AUDIO FIELD SETUP GUIDE
Using RODE Wireless GO II with One and Two Transmitters
Direct-to-FX6 Setup + Optional DR-60D AUDIO RECORDER & Boom Workflow
FX6-RODE FIELD RULE: Since the FX6 records only CH1 and CH2, the FX6 is now set up for a Two-person Interview or a Two-actor Scene scenario using Rode Tx1 and Tx2. For a ONE PERSON SHOOT, just turn ON the Rode Receiver and TX1 only. They should be already paired up. The Rode Receiver will display two channel signals moving but the FX6 Audio Display on bottom right of the Viewfinder LCD should be showing only Channel 1 moving. Ch2 will be silent, not moving. For a TWO PERSON SHOOT, turn ON Rode Receiver and both the TX1 and TX2. They both should be paired up to Receiver. When doing an audio test, the Receiver will again show two channels moving but now, the FX6 Audio Display on the LCD Viewfinder should be showing Channels 1 and 2 each moving alone as each person speaks. Do an audio test on each separately. THE FX6 AUDIO MENU SETTINGS HAVE ALREADY BEEN DONE. This is How It Was Done… A. Go to 6 AUDIO Menu, then to Audio Input, then to CH1 Input Select, and then choose INPUT1. Then go to CH2 Input Select and choose INPUT2. B. The above settings allow the TX1(Actor1) mono audio signal go to CH1/INPUT1 and TX2(Actor2) to CH2/INPUT2 via the camera-side XLR inputs. The Cable Techniques TRS 3.5mm to XLR Cable Splitter is key to this process. C. The UPSIDE of leaving the Rode/FX6 in a Permanent (but later changeable) Two-person Setup is that you can do a One Person Shoot just by NOT turning ON the TX2. Trying to go from a One Person Setup to a Two Person Setup in the field leaves you open to forgetting to set up both the Rode and the FX6 menus correctly, which is a timely and “easy to forget something VIP to Audio” process. D. The DOWNSIDE is that for each of the Shooting methods, you lose the ability to have a dual-channel audio signal both for TX1 and TX2, meaning that if TX1 or TX2 has noise on its one mono signal, you have to offload via Computer and the RODE CENTRAL App each Transmitter’s Internal Recorded mono audio to use as repair or recovery backup to correct the bad primary audio. E. The FIRST BACKUP WORKAROUND: Use the RODE Transmitter’s Internal Storage to create a mono audio backup for TX1 and TX2. Easy Does It… Turn ON and Keep ON each RODE Transmitter’s Internal Recorder using your computer and a downloaded App called RODE CENTRAL. This is a One-Time Setup. This should stay On in between Power down and power up cycles but F. STEPS To Do: F1. Plug TX1 or TX2 into your computer via USB-C. F2. Open RØDE Central. F3. Click the transmitter (TX1 or TX2). F4. Go to Device Settings. F5. You will see the following: F6. “On-board Recording” (Toggle: ON / OFF). F7. Record Mode (Choose Always, or Backup)— Options may vary depending on TX1 version/model/user manual, etc). Stores about 20 hours. Settings stay fixed between power/re-charge cycles. Offload audio to to clear storage between daily shoots if shooting full day so will not run out next day. Need to hook up to computer and use RODE CENTRAL App to manage internal storage audio files. F8. FROM This Point Forward: Keep both TX1 and TX2 set as follows: On-board Recording: ON; . Record Mode: Always Record. This means: Recording starts automatically when you power the transmitter. No need to press anything during filming. Every take is captured internally as a safety copy. F9. See RODE WIRELESS GO II Transmitter Internal Recording Guide.docx for further setup, operational and editing-use details. G. The SECOND BACKUP WORKAROUND if desired is to use a third audio source (a boom mic) that can capture the one or two speakers and record its two-channel audio onto the FX6 via the Shoe Onboard Recorder (requiring a $600 Sony Shoe-based Dual XLR Adapter to record onto Ch3 and Ch4) OR onto an external audio recorder such as the TASCAM DR-60D which we own as an option. This option would provide an isolated backup audio source for each of the speakers if noise were to be an issue on a critical shoot. P.S. In Cinema, Audio Reigns Supreme. Great visuals do not trump bad audio. This option is covered in Section “5. Two Transmitters Plus NTG5 Boom Mic And External Tascam DR-60D” below. |
|---|
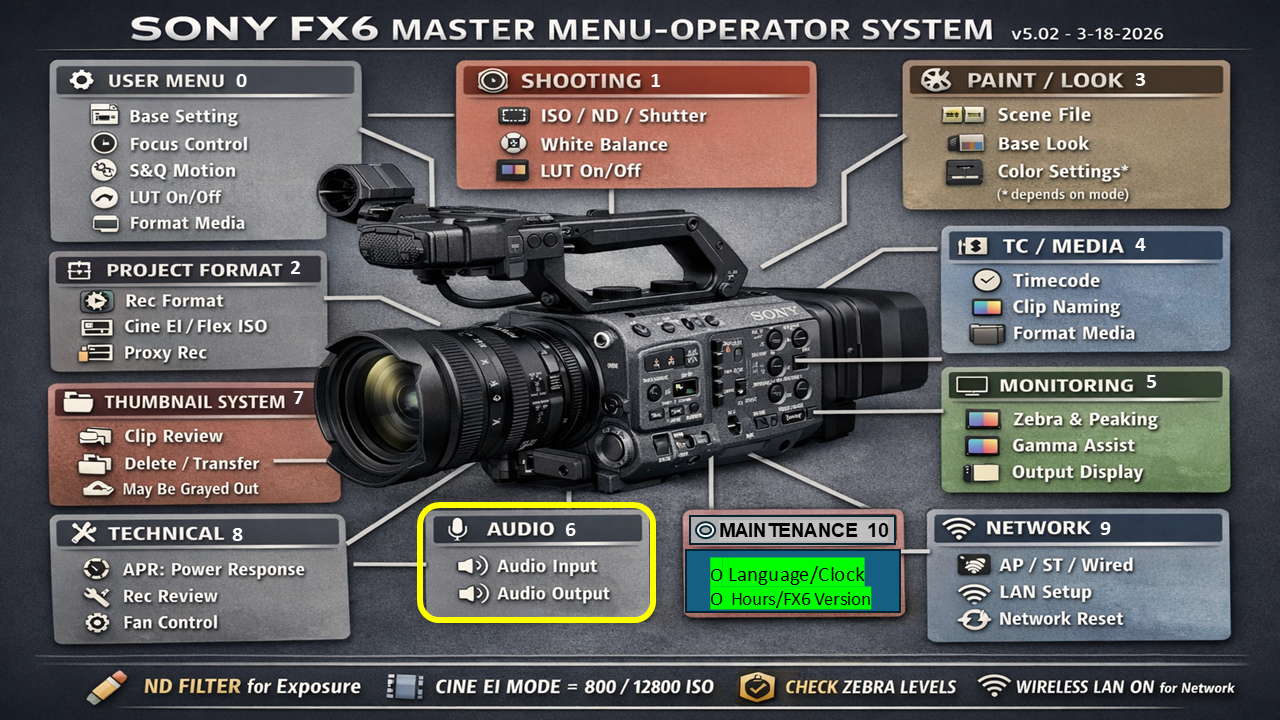
Table Of Contents
2. Critical Rule: Two FX6 Audio Channels Only 5
3. One-Transmitter Direct FX6 Setup (Use Existing Two Person Setup—Not This) 6
3.1 Intended result (Ignore) 6
3.3 Cable and switch settings (Ignore) 6
4. Two-Transmitter Direct FX6 Split-Track Setup For One Or Two Persons 7
4.1 Non-negotiable separation rule 7
4.2 Necessary Wiring diagram 7
5. Two Transmitters Plus NTG5 Boom Mic And External Tascam DR-60D 8
5.1 Tascam And NTG5 Boom Mic Setup And Wiring 8
5.2 First Steps 9
5.4 DR-60D Recorder workflow 10
5.5 DR-60D Starter Settings 10
6. DR-60D and FX6 Meter Targets and Gain Staging 10
6.1 FX6 and DR-60D Gain-Staging Order 10
6.2 FX6 and DR-60D Clipping response 11
7. Monitoring Setup (Both FX6 and Boom Mic Operator—Don’t Skip This) 11
8. On-Set Audio Test Procedure (With FX6 & Boom Operator Headsets) 11
9. Boom Operator Pro Tips 12
9.1 If you want to go one step further (optional but powerful) 12
9.2 Goal: Make one boom behave like “two usable backups” 12
9.3 The core principle (most important) 12
9.4 Placement strategy (FX6 framing aware) 12
9.5 “Lean tracking” technique (this is the pro move) 12
9.6 Distance control (critical for usable backup) 13
9.7 What this does in audio terms 13
9.8 How you use this in editing 13
Case C: overlap / noisy lavs 13
❌ Don’t try to center boom “for fairness” 13
10. Post-Production Handling 13
10.2 RODE NTG5 Boom Mic and Tascam DR-60D isolated WAV Backup Sync Workflow 14
1. Purpose and Scope
Purpose. This guide gives a repeatable field workflow for recording clean dialogue on the Sony FX6 using the RODE Wireless GO II system with either one transmitter, two transmitters, or two transmitters plus an optional boom microphone through an external recorder.
Scope. It covers direct-to-FX6 wiring, FX6 input/routing choices, RODE split/stereo operation, required cable types, safe gain staging, verification tests, post-production handling, and troubleshooting.
| Scenario | Best workflow | Result |
|---|---|---|
| One Person / one lav. CH2 is a backup for CH1. | One Wireless GO II transmitter (TX1) direct to FX6 INPUT1 | CH1 records the lav; CH2 can be a lower safety copy if routed that way. |
| Two Persons / two lavs (Note: The FX6 is Now Pre-set this way—explanation is below) *Use Transmitters’ Internal Storage as backup for TX1 and TX2 **(Or TASCAM Recorder and Boom RODE NTG5 mic). | Wireless GO II receiver in Split/Stereo mode to FX6 INPUT1 and INPUT2 with a true L/R breakout cable, such as the Cable Techniques Splitter Cable in use. See Section *E. The FIRST BACKUP WORKAROUND and **G. THE SECOND WORKAROUND above which summarize the available audio backup options. |
CH1 = TX1 and CH2 = TX2, isolated by audio settings inside FX6 Audio Menu and RODE Receiver. |
| Pros Use This: Two lavs and FX6 record primary audio and boom mic/recorder captures mono audio backup | **USE RODE NTG5 Boom mic to Tascam DR-60D external recorder to create a mono audio track containing isolated editable audio for each speaker as backup to use to repair/replace bad primary audio. | DR-60D Recorder captures isolated mono audio tracks as backup; FX6 captures primary mono track for each speaker via TX1 and TX2. |
| Field-use standard Every setup in this guide must be confirmed with headphones and a 5-second test recording/playback before the real take. Do not trust meters alone. |
|---|
2. Critical Rule: Two FX6 Audio Channels Only
| Critical rule The FX6 records CH1 and CH2 only. It cannot record three fully isolated sources internally. Two lavs can be isolated in-camera (TX1 mono to INPUT1 XLR and TX2 mono to INPUT2 XLR). Two lavs plus a boom mic is needed if backup mono audio is wanted for the two primary audio tracks. OR… You can capture mono audio in each of the Transmitter’s Internal Storage as backup audio—up to 20 hours per Shoot. |
|---|
A. One Person shoot: One transmitter can be recorded directly as a single (mono) lav track on CH1, with an optional lower safety single mono lav track on CH2.
B. Two Person shoot: Two transmitters can be recorded directly as separate CH1/CH2 (mono) tracks only if the receiver output and cable preserve left/right separation, i.e. Rode Wireless GO II Receiver must be in Split mode. This mode has no backup audio if either or both of the speaker mono audio is bad UNLESS you capture mono backup audio with the Transmitter Or TASCAM/Boom Mic option.
In Split mode, a TX1 mono audio is sent to the Tip of the 3.5mm TRS output port. The TX2 mono audio is sent to the Ring of the TRS 3.5mm output port. The Cable Techniques Splitter Cable’s TRS 3.5mm inserted into the Receiver output port then sends the TX1 mono audio to FX6’s XLR INPUT1 and TX2 mono audio to XLR INPUT2. The result is two isolated mono tracks that are fully independent in Post. Each mono audio (CH1 and CH2) can also be gain-adjusted or muted via the FX6 Left-side External Audio Control Dials. Ch1 and CH2 external settings, incidentally, must be set to MANual.
C. Two Person Shoot With Tascam DR-60 For Backup: Two lavs plus a boom mic input cannot fit as three isolated tracks inside the FX6’s two XLR ports. Use the TASCAM DR-60D workflow in Section 5 to record a third isolated mono audio track for a backup of both speakers in a Two Person Shoot.
| What you plug in | What the FX6 can record | Post-production consequence |
|---|---|---|
| A. One RODE transmitter through one FX6 input (Do not use this option unless you want the hassle of Rode Receiver and FX6 Menu settings) | One isolated audio file, plus a second optional safety audio file if routed | Straightforward edit of CH1; CH2 safety audio as backup audio can rescue light clipping or noise on CH1 if CH2 is set lower. |
| B. Two RODE transmitters Split L/R into two FX6 inputs (Use this option for One or Two Person Shoot). RODE Wireless GO II Receiver and FX6 menus are pre-set for this option. | Two isolated lavs: CH1 and CH2, each getting mono audio only’ (CH1 if One Person Shoot or CH1 and CH2 if Two Person Shoot) | Good… Each voice mono audio can be edited separately. Downside, you have no backup if one of the speaker’s audio is bad UNLESS you use Transmitter Option Or TASCAM/Boom Mic option’ also. Upside: You do not have to change settings to go from one speaker to two. |
| C. Two transmitters plus Rode NTG5 boom mic into TASCAM DR-60D Audio Recorder (See Section 5 option if desired) | Only two channels in camera… so the DR-60D records a backup mono audio tack | The DR-60 external recorder provides a way to record a backup mono track that captures all speakers and room/environment sound that can be used to rescue/fix/replace bad audio on the FX6. |
3. One-Transmitter Direct FX6 Setup (Use Existing Two Person Setup—Not This)
One Person Shoot the Hard Way-- Use this when only one person is wired with one RODE Wireless GO II transmitter and you want the simplest possible direct camera recording and you want to risk messing up audio during a field change. For use if you must have dual mono audio tracks for the One Person Shoot.
3.1 Intended result (Ignore)
FX6 CH1 = primary lav from TX1.
Optional FX6 CH2 = lower safety copy of the same lav, if you route INPUT1 to both channels and set CH2 lower.
No External recorder is required for this single-lav setup nor use of Transmitter Internal Recording.
3.2 Wiring diagram (Ignore)
| RODE TX1 + lav mic | | wireless v RODE Wireless GO II receiver | | 3.5 mm TRS output to proper FX6 input cable/adaptor v FX6 INPUT1 | +--> CH1 = main lav +--> CH2 = optional safety copy from INPUT1 at lower level |
|---|
3.3 Cable and switch settings (Ignore)
| Item | Recommended setting/action |
|---|---|
| Cable | RODE receiver 3.5 mm TRS output to FX6 INPUT1 using a proper camera/audio cable or adapter. For XLR input, use a cable/adaptor intended for unbalanced 3.5 mm receiver output to XLR. |
| FX6 input switch | Start with MIC for direct RODE receiver output into the FX6 XLR input. Do not use MIC+48V. Phantom must stay OFF. |
| FX6 channel routing | Set CH1 Input Select = INPUT1. For a safety copy, set CH2 Input Select = INPUT1 too, then run CH2 lower than CH1. |
| RODE receiver mode | Merged/mono behavior is acceptable with one transmitter because there is only one source to record. |
| RODE output level | Start conservative. Raise only until normal speech lands in the target range without clipping. If the receiver or FX6 clips, reduce receiver output first. |
3.4 Level targets (Ignore)
Normal speech: aim around -18 to -12 dBFS on the FX6 meter.
Loud speech: occasional peaks around -10 to -6 dBFS are acceptable; no red clipping.
Safety channel: set CH2 roughly 6 to 12 dB lower than CH1 if using a safety-copy workflow.
Headphones: listen for hiss, clothing rustle, RF dropouts, breath noise, room noise, and distortion.
4. Two-Transmitter Direct FX6 Split-Track Setup For One Or Two Persons
Note: There is no backup mono audio if using this option, whether doing a One or Two Person Shoot-- UNLESS you also use Transmitter Internal Recording OR the TASCAM/Boom Mic backup mono audio option.
One Person Shoot—Use this for One Person Shoot by simply NOT Turning On TX2. Everything on RODE and FX6 is pre-setup to accommodate either One (TX1) or Two Person Shoot (TX1 and TX2).
Two Person Shoot-- Use this when two people each wear a RODE transmitter and you want both voices isolated directly inside the FX6 as CH1 and CH2. Simply turn on Receiver and TX1 and TX2, which should be already paired to Receiver.
4.1 Non-negotiable separation rule
| Do not merge the two transmitters (RODE Receiver Must be and
Stay in Split mode) The RODE receiver must output TX1 and TX2 as separate left/right channels, and the cable must split left/right into two separate FX6 inputs. A mono cable, camera headphone splitter, or summing adapter destroys isolation. |
|---|
4.2 Necessary Wiring diagram
RODE TX1 + lav mic -------------------> RODE Wireless GO II
receiver (wirelessly through pairing) Receiver 3.5 mm TRS output: The above is an anomaly. What is key is to ensure the FX6 Use 3.5mm TRS stereo to dual XLR-M Cable Techniques Splitter breakout cable… (The 3.5mm male end plugs into the RODE Receiver 3.5mm output port) and the Red and Blue XLR male ends plug into the FX6 XLR Ports. RED (Left XLR) --> FX6 XLR INPUT1 --> CH1 = TX1 (Feeds TX1 mono
audio to CH1) |
|---|
4.3 Required settings
| Control point | Setting |
|---|---|
| RODE receiver (Already done) | Set output mode to Split/Stereo so TX1 and TX2
remain separate left/right channels. |
| Cable (Already done) | Use a true 3.5 mm TRS stereo to dual XLR-M left/right breakout cable. The cable must preserve left and right; it must not sum them. (Use Cable Techniques TRS 3.5mm to XLR Cable Spliter) |
| FX6 INPUT1 (Already done) | VIP INFO: Set on MIC, Phantom OFF. Receives Left/TX1 from the Splitter breakout cable. |
| FX6 INPUT2 (Already done) | VIP INFO: MIC, phantom OFF. Receives Right/TX2 from the Splitter breakout cable. |
| FX6 routing (Already done) | VIP INFO: CH1 Input Select = INPUT1. CH2 Input Select = INPUT2. |
| Monitoring | Always use Headphones on the FX6. Test Speaker on each transmitter separately and confirm only the correct channel moves when TX1 or TX2 person speaks. |
External Audio Dials (Already done) |
VIP INFO: Set CH1 slider to MANual, Set Audio Dial to 5 (And adjust if needed after testing). It is easy to blow out audio (clipping) so usually keep at 5-6 or 7 depending on where TX1 and TX2 mics are placed and loudness of person’s voice etc. Set CH2 the same as above. |
4.4 Verification test
TX1-only test: mute or turn off TX2. Speak into TX1. Only FX6 CH1 should move.
TX2-only test: mute or turn off TX1. Speak into TX2. Only FX6 CH2 should move.
Both-transmitters test: speak alternately into TX1 and TX2. Confirm CH1 and CH2 moves separately.
Tap test: lightly tap each lav cable/transmitter and confirm the tap appears only on the assigned channel.
Record/playback test: record 5 seconds, then play back with headphones before the real take. The Headphone setting in the FX6 Audio menu is set to hear both CH1 and CH2 at same time, not Ch1 in one ear and CH2 in the other. Watch the VF LCD Audio Meter instead constantly to closely monitor audio.
5. Two Transmitters Plus NTG5 Boom Mic And External Tascam DR-60D
This is a SETUP FOR A COMPLETE BACKUP-ONLY ISOLATED AUDIO FOR TX1 AND TX2.
The current settings for FX6 and Rode Receiver and TX1 and TX2 (in Two Person Shoot Mode) remain primary and unchanged. This FX6 wiring is Rode TX1 ---> FX6 (RED) INPUT1 / CH1 and Rode TX2 ---> FX6 (BLUE) INPUT2.
The Tascam Audio Recorder DR-60D does not receive TX1 / TX2.
The Tascam records a separate NTG5 boom mic mono audio backup (requires special mic to capture clear dialogue on mono only without getting ambient background sounds also (NTG5 mic is a good mid-range open to use).
5.1 TASCAM AND NTG5 BOOM MIC SETUP AND WIRING
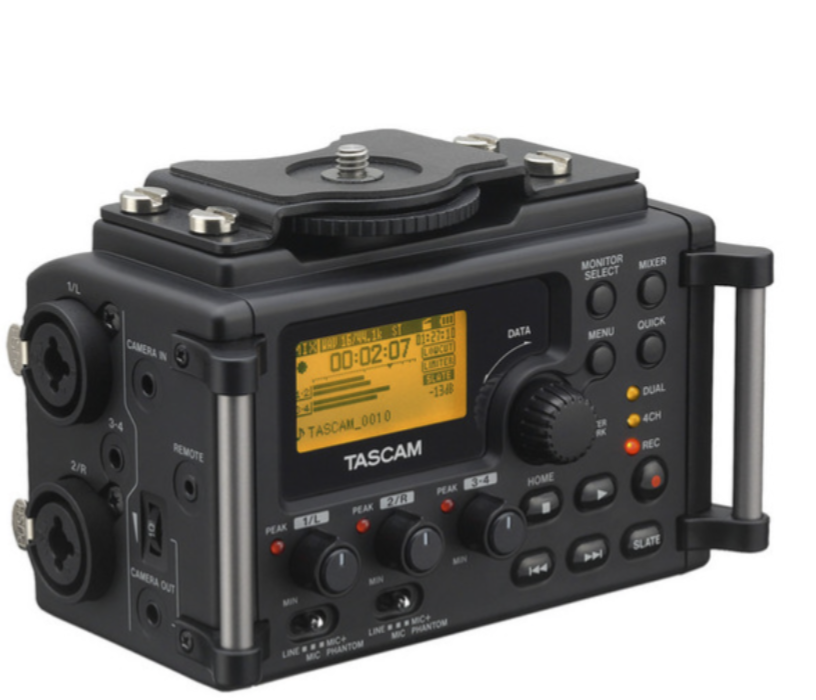
So the final setup for NTG5 to Tascam For Boom Mic-Only Backup is:
NTG5 Boom mic ---> Tascam (backs up independent mono audio for TX1 & TX2 repair in case FX6 primary mono audio for one or the other is completely bad or has some bad or noisy spots).
5.2 First Steps
0. Put 4 fresh AA batteries in Tascam (if needed) and turn it On.
1. Turn Off the Tascam Phantom Power (+48V) in Tascam Menu. (Off when adding or removing cable)
2, Plug the boom mic (recommended RODE NTG5 $500) into the Tascam (via standard 3-pin XLR cable)
into 1/L (INPUT1) of the Tascam.
3. Turn On the Tascam Phantom Power (+48V) in Tascam Menu.
5.3 Correct Wiring
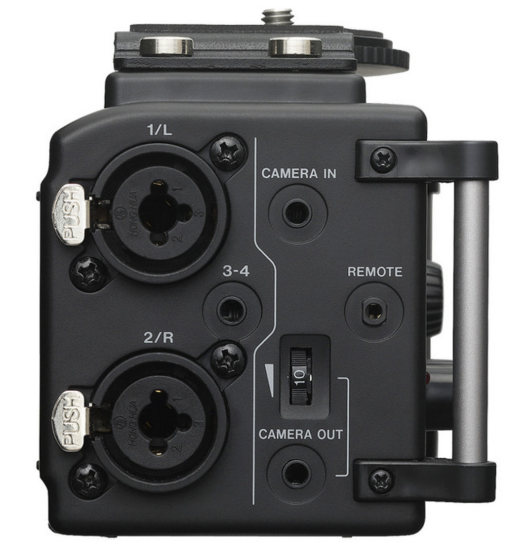
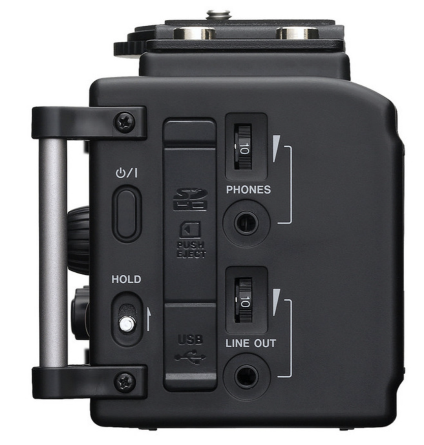
RODE NTG5 Boom Mic’s 3-Pin XLR to female 1/R port (External
INPUT1) on left side of Tascam DR-60D Audio Recorder. That’s all--
keeping it simple. Boom Operator Headset 3.5mm plug goes into “Phones” on right side. Volume dial is there also. 1/R XLR Input Port (INPUT1) |
|---|
5.4 DR-60D Recorder workflow
| SIDENOTE: DR-60D input reality The DR-60D has two XLR inputs and one 3.5 mm stereo EXT IN that can serve as CH3/CH4 but we are not using CH3 and CH. We are only using CH1 in mono mode. |
|---|
| Source | DR-60D input | Recorder result |
|---|---|---|
| RODE NTG5 Mic | RODE NTG5 mic output XLR to DR-60D 1/R XLR Port | NGT5 Boom mic isolated mono audio in WAV format (containing backup for Two Persons) |
5.5 DR-60D Starter Settings
| DR-60D control | Starter setting |
|---|---|
| Record format | WAV, 48 kHz / 24-bit. |
| Record mode | MONO recording (for Input1 only-- NTG5 boom clean mono backup) |
| Wireless GO II into CH3/CH4 | EXT IN set appropriately for the receiver level. Start conservative and meter normal/loud speech. |
Input1 MIC Leave INPUT2 Unused i.e. OFF |
Set MIC Phantom ON for RODE NTG5 boom mic. (Set Phantom OFF if you ever use DR-60D with a different mic for another purpose if mic is battery-powered or is a dynamic mic). |
| Limiter | Set to ON as a safety net, but do not rely on it to fix bad levels. |
| Low cut (Highly recommended) | Turn ON: Set to 80-120 Hz to remove wind rumble, handling noise, camera vibrations |
| Level Setting (Critical) | Set Gain so speech lands here:
|
6. DR-60D and FX6 Meter Targets and Gain Staging
| Signal/check | Target |
|---|---|
| DR-60D Settings for isolated boom track | Around -12 to -10 dBFS peaks; Note: closer mic placement to speaker is better than excessive gain. |
SIDENOTE For FX6 Settings: Normal speech on FX6 direct setup Loud speech on FX6 direct setup |
Occasional -10 to -6 dBFS peaks; never red or clipped. Occasional -10 to -6 dBFS peaks; never red or clipped. |
6.1 FX6 and DR-60D Gain-Staging Order
Set the microphone placement first. Bad placement cannot be fixed by gain adjustments.
Set RODE receiver/transmitter volume dial on FX6 CH1 conservatively. Avoid hot positive gain values unless testing proves they are needed.
Review/Set FX6 or DR-60D input levels while talent speaks normally and loudly.
Listen with headphones for distortion, rustle, RF dropouts, room noise, and breath noise.
Record and play back 5 seconds before the real take.
6.2 FX6 and DR-60D Clipping response
If TX1/TX2 direct-to-FX6 clips, reduce RODE receiver output first, then lower FX6 input gain/side dial.
If DR-60D clips, try lowering the DR-60D INPUT1/CH1 gain.
Do not fix clipping by relying on limiters. Limiters are safety nets, not the main gain-setting tool.
7. Monitoring Setup (Both FX6 and Boom Mic Operator—Don’t Skip This)
Plug headphones into FX6 and DR-60D 3.5mm output ports and confirm:
Clean voice only and good audio levels
No hiss overload or popping. (loose batteries cause issues at times)
No clipping distortion
No unwanted background noise such as wind, electronic humming or airplanes flying over
No phantom power silence (NTG5 failure check)
8. On-Set Audio Test Procedure (With FX6 & Boom Operator Headsets)
| Step | Action | Pass condition |
|---|---|---|
| 1 | FX6 Oper: Power on FX6, RODE receiver, transmitters, and DR-60D. | All batteries/cards are ready; no low-battery warning. |
| 2 | FX6 Oper: Confirm receiver mode is Split: Two transmitters for isolation must be Split/Stereo. | TX1/TX2 must not merged when two isolated tracks are required. |
| 3 | FX6 Oper: TX1-only test. | Only CH1 moves in the two-transmitter direct-FX6 workflow (Lower right VF LCD Audio Meter). |
| 4 | FX6 Oper: TX2-only test. | Only CH2 moves in the two-transmitter direct-FX6 workflow Lower right VF LCD Audio Meter) |
| 5 | FX6 Oper: Both-TX1 and TX2 transmitters test. | Both channels move independently and do not bleed into the wrong side. |
| 6 | Boom Oper: RODE NTG5 boom mic test | Boom has audio signal present on the intended DR-60D INPUT1/CH1 only, not on FX6. |
| 7 | Boom Oper: Headphone check from Tascam DR-60D 3.5mm output port.. | No distortion, no dead channel, no hum, no lav rustle, no obvious RF dropouts on NTG5 boom mic. |
| 8 | Both FX6 and Boom: 5-second record/playback. | Playback confirms correct channel assignment and usable levels. |
| Do not skip playback A 5-second test recording catches wrong receiver mode, bad cable wiring, phantom mistakes, dead channels, and accidental summed audio before the actual take. |
|---|
9. Boom Operator Pro Tips
9.1 If you want to go one step further (optional but powerful)
I can show you a setup that gives you true per-actor boom isolation (closer to production mixing)
or how to mic-place your NTG5 so it “leans” toward whichever actor is speaking, making it behave almost like dual backup. This is where you turn a simple “backup boom” into something that actually behaves like a flexible dialogue rescue track.
You’re still limited to one NTG5, but you can make it function like a selective per-actor backup source through placement + technique.
9.2 Goal: Make one boom behave like “two usable backups”
We’re aiming for:
TX1 fails → boom clearly favors Actor 1
TX2 fails → boom clearly favors Actor 2
overlap scenes → still usable as clean dialogue bed
This is not true separation—but it becomes very workable in post.
9.3 The core principle (most important)
A boom is not “pointed at the camera”—it is moved between voices continuously
You are essentially doing:
“soft tracking microphone”
not a fixed overhead mic
9.4 Placement strategy (FX6 framing aware)
Assume typical dialogue two-shot or OTS.
Standard position:
Boom above frame line
angled ~45° down
pointed slightly off-center, not dead middle
Rule:
Always bias toward the current speaker—not center of scene
9.5 “Lean tracking” technique (this is the pro move)
Instead of holding boom static:
When Actor 1 speaks:
Move capsule slightly toward Actor 1 (10–20° shift)
When Actor 2 speaks:
Slowly pivot toward Actor 2
Think:
🎯 “Follow the mouth, not the body”
9.6 Distance control (critical for usable backup)
Keep consistent:
6–12 inches above frame line
2–4 feet from talent horizontally (depending framing)
Avoid:
swinging too far (tone changes too much)
getting too close (pops / proximity effect overload)
9.7 What this does in audio terms
This creates:
Instead of:
flat mono room track
You get:
subtle natural “focus shift”
slight gain advantage on current speaker
better clarity per line
So in post:
TX1/2 still primary
boom becomes intelligible line replacement tool
9.8 How you use this in editing
You will NOT “mix boom evenly.”
Instead:
Case A: TX1 bad line
replace ONLY Actor 1 line segment with boom
Case B: TX2 bad line
replace ONLY Actor 2 line segment
Case C: overlap / noisy lavs
mix boom under lavs at low level (-15 to -25 dB)
9.9 Big mistake to avoid
❌ Don’t try to center boom “for fairness”
That creates:
equal bad pickup of both actors
worse intelligibility
muddy dialogue
10. Post-Production Handling
10.1 Direct FX6 audio
One-transmitter setup: use FX6 CH1 as the main lav; use CH2 as a safety copy only if it was routed and recorded lower.
Two-transmitter split setup: use FX6 CH1 for TX1 and FX6 CH2 for TX2. Edit each voice independently.
(This FX6-dual transmitter audio-- mono for each-- is the primary project audio, no backup exists and
label tracks immediately after ingest: CH1_TX1, CH2_TX2 as FX6 primary mono audio).
10.2 RODE NTG5 Boom Mic and Tascam DR-60D isolated WAV Backup Sync Workflow
Use the DR-60D WAV file as backup because it contains the isolated mono audio for both speakers.
The FX6 audio is the primary project audio.
In DaVinci Resolve: Only synch DR-60D external WAV file if needed to repair or replace bad FX6 audio.
After sync, mute or disable the FX6 repaired or replaced audio unless it is needed as reference backup.
| Slate Still Helps (I don’t trust synch) Even when waveform sync usually works, Clap/Mark or Slate at the start of each take. A clean transient gives the NLE and the editor a reliable sync point per scene-- or scene sequence at the very least. |
|---|
11. Troubleshooting
| Problem | Likely cause | Fix |
|---|---|---|
| TX1 and TX2 are merged when desired to be Split as individual mono tracks | RODE receiver is in merged mode, mono cable is used, or adapter sums L/R. | Set receiver to Split/Stereo. Replace cable with true TRS-to-dual-XLR L/R breakout. Repeat TX1-only/TX2-only tests. |
| Dead channel | Wrong input selected, bad cable, muted transmitter, dead battery, or receiver not paired. | Check transmitter pairing/battery, cable seating, FX6 input routing, input switches, and meters. |
| Clipping/distortion | RODE output too hot, FX6 gain too high, DR-60D gain too high, or line output fed to MIC input. | Lower upstream output first; confirm FX6 MIC vs LINE choice; re-test loud speech. |
| Hum/buzz | Wrong cable/adaptor, phantom mismatch, nearby interference, or bad power/cable contact. | Turn phantom OFF for RODE/camera feeds. Replace cable. Separate wireless gear from phones/metal/power supplies. |
| Lav rustle | Capsule rubbing clothing, loose cable, jewelry/hair contact, bad mount. | Re-mount lav using tape triangle, strain relief, and a cleaner clothing position. Perform rustle test. |
| Wireless dropout | RF distance/obstruction, body blocking, low battery, phone/metal interference. | Move receiver higher/closer, keep TX away from phone/metal, replace battery, re-pair if needed. |
| Boom hollow or thin | Boom too far, off-axis, wrong aim, low-cut too aggressive, room reflections. | Move boom closer, aim toward upper chest/mouth area, reduce aggressive low cut if voice thins out. |
| Wrong phantom setting | MIC+48V accidentally applied to RODE receiver or camera feed. | Turn phantom OFF immediately for RODE Wireless to FX6 camera feed paths. Use phantom for NTG5 boom mic to DR-60D that require it. |
FX6 AUDIO FIELD SETUP GUIDE Ver. 1.0.docx